Solved: Aestan Tray Menu Configuration File Error
Learn how to fix WAMP Aestan tray menu configuration file error without reinstalling WampServer on windows 10
WAMP is a much-loved application for web developers such as myself. It offers a development environment to develop and test applications, manage databases (MySQL and MariaDB) before deploying them to the environment. However, just like any other applications you are likely to be met with errors. Today, we look at the {Ashtray Error} as shown in the image below:
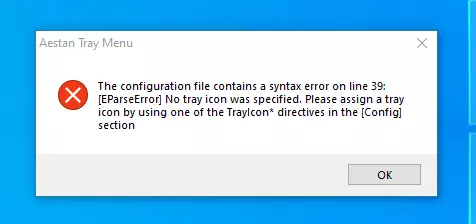
The configuration file contains a syntax error on line 39; [EParseError] No tray icon was specified. Please assign a tray icon by using one of the TrayIcon* directives in the [Config] section
Here are my app versions and configurations:
-
WAMP 3.2.6
-
Apache 2.4 (2.4.54.2)
-
PHP 5, 7 & 8
-
MySQL 8.0.31
-
MariaDB 10.10.2
-
PhpMyAdmin 5.2.0
-
Windows 10 Pro 64-bit. Hence my WAMP server installation is in c:/wamp64 directory.
What Causes the Aestan Tray Error in WAMP?
The error is caused when the web server loses power as it is still running usually due to the server PC losing power. In my case, the PC lost power as the web server was starting the required services (while the icon was still orange). In other cases, the error can also occur when the web server is fully running and all services started and the server abruptly shuts down due to power loss.
The error is associated with a corrupt wampmanager.ini file due to missing entries in the file. As the WAMP server is starting, and running, it generates new entries and writes them onto the wampmanager.ini file. When the writing is interrupted by loss of power the file is incomplete and corrupt hence unusable. When starting up the WAMP server after recovering from the power loss, the server attempts to read the corrupt file which leads to the above error.
Solving WAMP Aestan Tray Error
There are a few methods that can be used to recover from this error. However, most recommend copying a previous wampmanager.ini into the WAMP’s root directory. This is not possible if you had not created a backup file. Other recommendations are to reinstall the WAMP server entirely. This route will definitely solve the error, however, if you do not have configurations, files, folders, and databases backed up, you will lose a lot - however, this solution might be inevitable in the long run and there are somewhat safer ways to reinstall WAMP without losing projects.
In this article, we try to solve the error without losing any data or configuration. The process is simple and requires no special downloads to the PC. Since the error is due to a corrupt wampmanager.ini file, we need to create a new wampmanager.ini to replace the corrupted one.
STEP 1 - Get the CLI PHP Version Path
To get the PHP Path, we need to get the exact and full PHP directory name. Go to C:/wamp64/bin/php/. If you have one PHP version installed, note the folder name and proceed to step 2. If you have multiple PHP versions, you need to select the version that is used by the WampServer in CLI (Command Line Interface) mode.
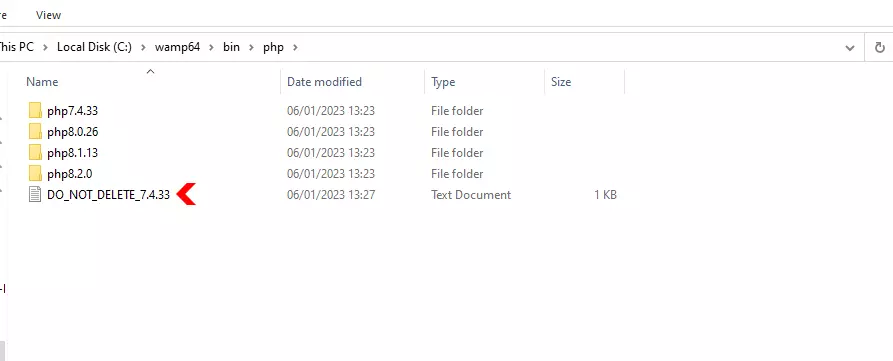
You will notice a text file named DO_NOT_DELETE_xxxxx where xxxxx is a PHP version. In my case, the active version is 7.4.33. The text file contains the following information:
This PHP version 7.4.33 is used by WampServer in CLI mode. If you delete it, WampServer won't work anymore.
The PHP version may vary from yours, however, the concept is the same. We need to copy the full path to the directory php7.4.33. In my case, this will be:
C:/wamp64/bin/php/php7.4.33
We will use this path in the steps to come. To get the PHP path you can either:
-
Type it elsewhere (such as on notepad) and copy it to paste later
-
Open the PHP folder with the version needed, click the folder path box at the top and copy the path
-
Note the path to type it in later in the coming steps
Armed with the PHP path C:/wamp64/bin/php/php7.4.33, we can now proceed to the next steps.
STEP 2 - Open System Environment Variables
On Windows OS, click the START button (bottom-left), and type in environment variables. From the results, click on Edit the System Environment Variables.
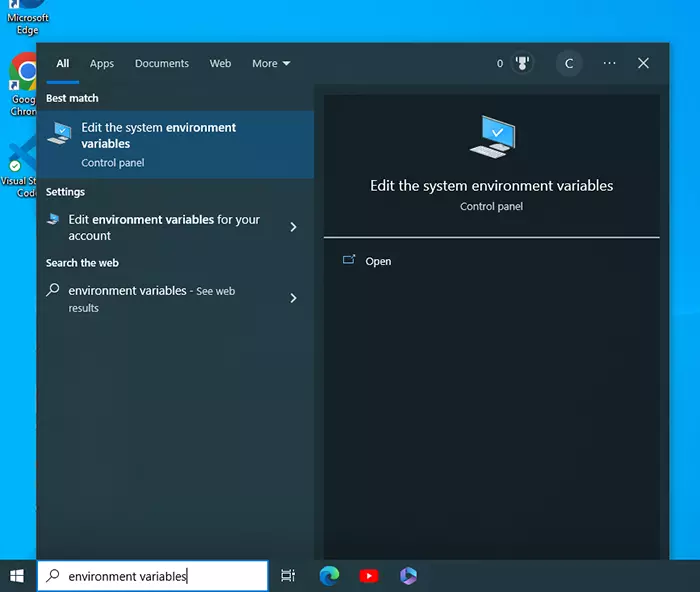
This will open a System Properties dialog box.
STEP 3 - Environment Variables on System Properties
On the System Properties dialog box, Click on Environment Variables
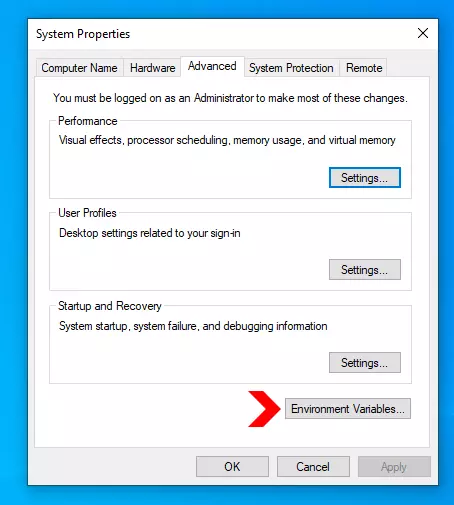
An Environment Variables dialog box will open.
STEP 4 - Edit Environment Variables
On the Environment Variables dialog box, under User variables for [Computer name] section, click on the line with the variable Path to highlight it. Once highlighted, click on the Edit... button under the same section.
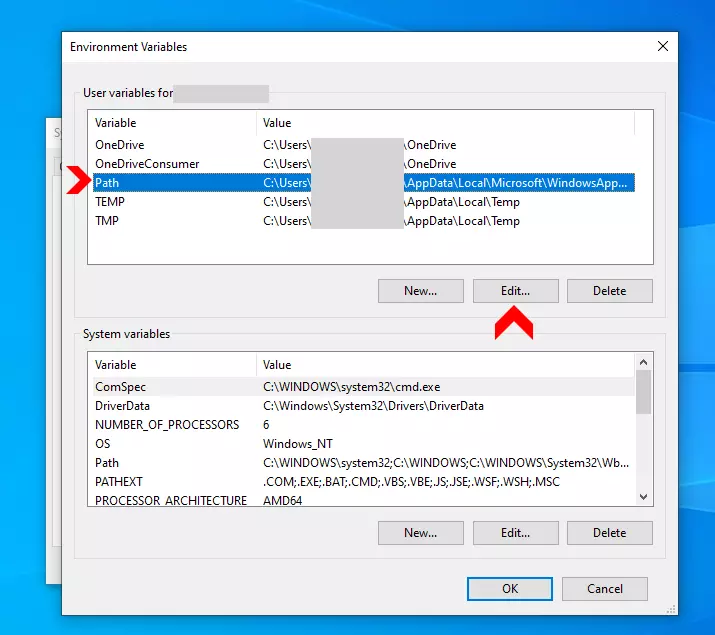
An Edit environment variable dialog box will open.
STEP 5 - Add PHP to the Environment Variables
On the Edit environment variable dialog box, click on the New button. On the newline, paste (Ctrl + V) the PHP Path copied in Step 1.
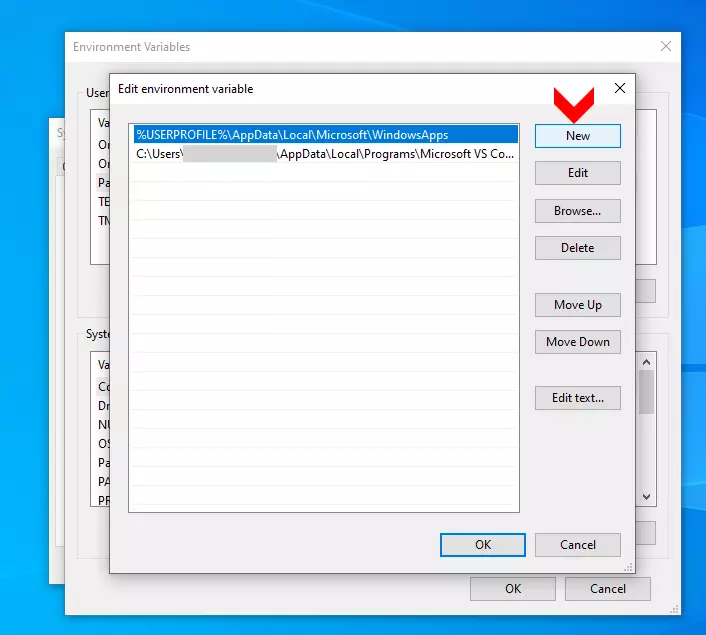
The new PHP variable should appear as shown below:
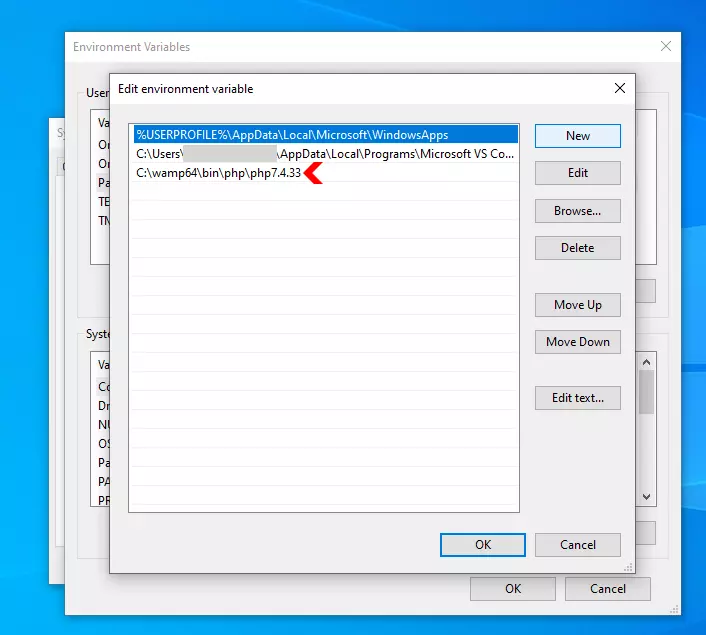
Click on the OK button on the Edit environment variable box.
Click on the OK button on the Environment Variables box.
Click on the OK button on the System Properties box.
STEP 6 - Open Command Prompt (CMD) - Run as administrator
On the Windows Start button, search cmd. Under the Command Prompt App result, click Run as administrator. Else, right click the Command Prompt result and select Run as administrator.
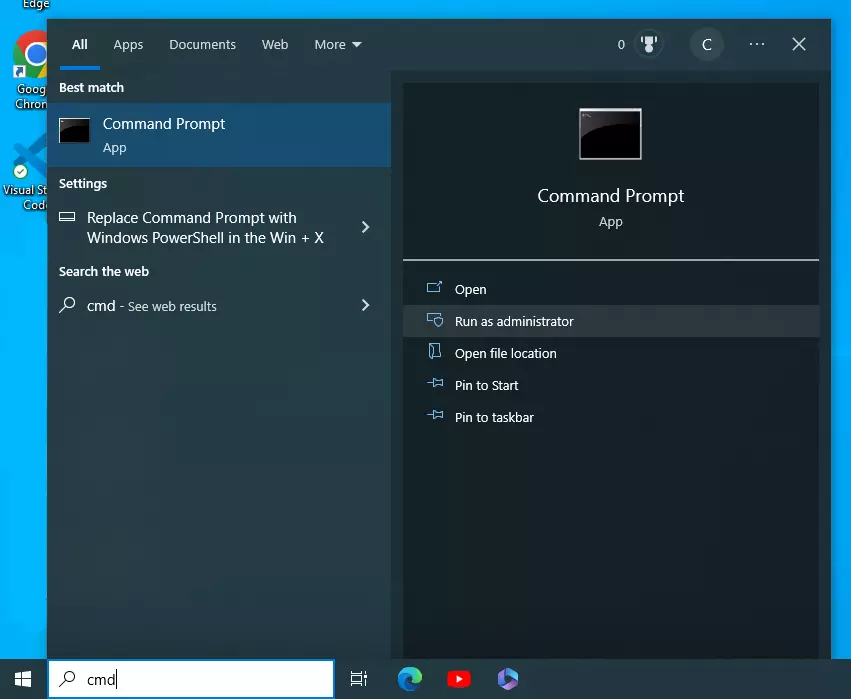
The Administrator: Command Prompt window will open.
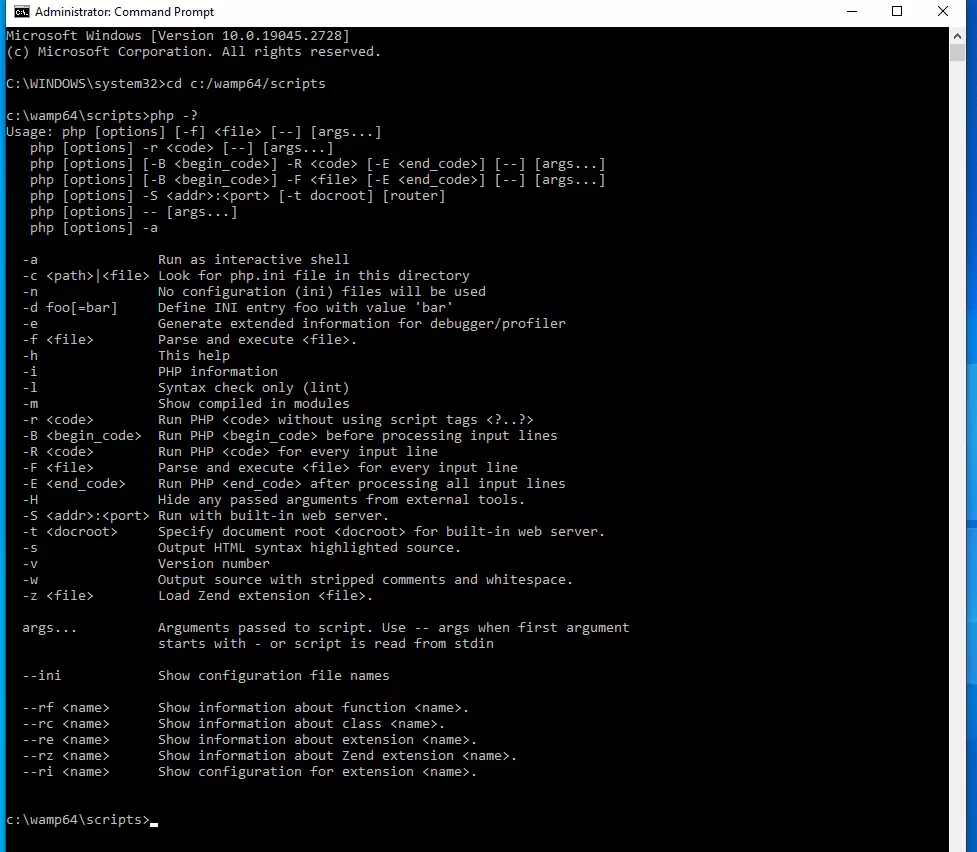
STEP 7 - Make WAMP's Scripts Directory Active
In the new CMD window, the default directory path is C:\WINDOWS\system32>. Change the path to that of the scripts directory in WAMP - C:/wamp64/scripts - by executing the cd C:/wamp64/scripts command as show below.

STEP 8 - Test if the PHP was added successfully
To test if the PHP variable was successfully added, run the php -? command. If you get the output as that shown below, the variable setup failed.
'PHP' is not recognized as an internal or external command, operable program or batch file.
Go back to the steps above and see if everything was done correctly. If you verify that all steps were correct, restart your PC and try to test the PHP output in Step 7 above.
If it was successful, you should see output as shown below.
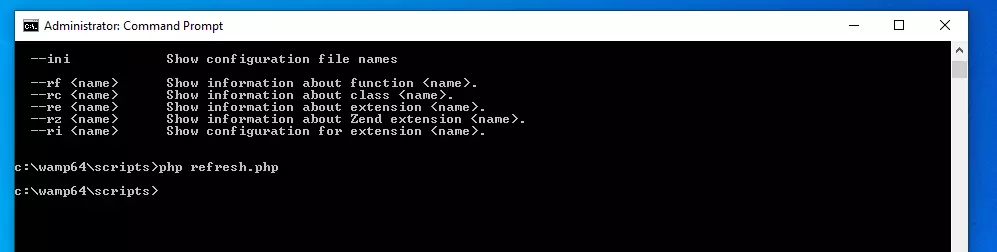
STEP 9 - Run the refresh.php Command
If the PHP output is okay, type the refresh.php command as shown.

Press Enter.
If the refresh command is successful, the CMD will output a new line of the active directory as shown.
Close the CMD windows, and start / restart the WAMP server.
STEP 10 - Back up wampmanager.ini File
I recommend copying the wampmanager.ini to another location. In case the Aestan Tray Error appears, you can simply copy the backup and replace the existing one in C:/wamp64/.
RELATED TO WAMPSERVER
How to Create WAMP Virtual Hosts: A Step-by-Step Guide
Automatically Launch WAMP on Windows 10 Startup- 3 Easy Steps
Solved: WAMP Icon Won't Turn Green
Solved: WAMP PHPMyAdmin Error 403 Forbidden
Solved: WAMP Forbidden Error 403 on Localhost
What is WAMP? A Beginner's Guide to WAMP Server
WAMP vs LAMP: Differences and Similarities between WAMP and LAMP
Accessing WAMP Localhost on Mobile Browsers